
Mountaineering is challenging mentally and physically. On a mental level, mountaineers require unwavering focus, determination, and the ability to overcome failure. On a physical level, climbing high mountains pushes the body like very few other sports.
Mental preparation for scaling mountain peaks is a subject of its own and requires a separate discussion. In this blog post, We’ll focus on the physical preparations you can make to either get started in mountaineering or improve your current levels of endurance and strength. These training and skill ideas will help you improve your overall fitness but, more specifically, help you climb faster and with better efficiency. You will also enjoy the sport more and reduce the chances of injury thanks to your improved flexibility and extra gas in the tank.
Want to be as fit as a mountaineer? Want the lung capacity, upper body strength, and leg endurance of elite mountain climbers? Read on.
Strength and Muscle Imbalances
It’s undeniable that serious mountain climbers achieve levels of fitness and strength beyond the average gym rat or casual sports enthusiast. But it’s also true that many mountaineers lack important aspects of strength, often because of imbalances in their muscle groups. Maintaining equal levels of relative strength in opposing muscles groups is crucial for avoiding injury and for producing efficient force. Some climbers are relatively weak in terms of absolute strength. What they are good at is sustaining a constant-load situation for a very long time.
Mountaineering will tax your body to the point of damaging it. The effects of high-altitude climbing on the body are non-negligible. Just as running a marathon every day (although many extreme athletes do so) can lead to repetitive strain injuries, climbing mountains can also cause issues with overworked muscle groups. Balance is the key here. Training for running or cycling without including some form of strength or cross training can lead to the overdevelopment of some muscle groups and weakness in others.
One of the most important things a mountaineer can do to increase the lifespan of their climbing career is to address muscle imbalances in their body. Don’t think you don’t have any! We all do. A mountaineer will often favour one hand over another, especially for cutting ice or belaying. Mountaineering often requires a lot more pulling strength than pushing strength. If you constantly work muscles on one side of your body, they can become tight and cause posture issues. The opposing muscles will have a tendency to loosen and become weak (if they are not trained).
Address muscle weaknesses and imbalances between opposing groups of muscles before it’s too late.
One of the best ways to work body parts that are weak is to train with weights. Training programs for almost every sport, professional and non-professional, these days include a weight training element.
Let’s answer an important question that many people ask when considering strength training for their sport.
Does Weight Training Make you Slow?
The internet is full of conversations about how weight training will impede your climbing ability. But the science proves that this claim is not true.
Building muscle will come at the expense of fat. Weight gain (if any) will be due to increased muscle mass. If you’re training for power and strength these gains should not hamper your speed in the mountains. Power and strength gains benefit every aspect of your climbing. Having stronger quadriceps will in no way make you climb less efficiently. Adding muscle to your shoulders and forearms will provide greater climbing power and help prevent injury. Ignore the old-school climbers and the snobs.
Strength training can benefit any athlete in any sport. It just depends on how you approach your training. In this article, we’ve outlined some important exercise protocols specifically for the mountaineering community.

Although many rock climbers (and Olympic weightlifters) have very high relative strength ratios (compared to their weight), trying to be as light as possible is not a goal worth pursuing. Long periods of time in the mountains put stress on the body and often lead to substantial weight loss. Dipping below the optimal weight threshold for a climber will negatively affect strength. Climbers with little body fat are vulnerable to muscle cannibalisation as the body fights starvation from long periods of aerobic exercise.
Walking up hills, climbing rock walls with a pack, ice-climbing, and rope work demands the use of strength (anaerobic) and endurance (aerobic) systems. Sustained capacity for strength over long periods is the key to climbing efficiently. Endurance is critical. However, the more supple and strong you are, especially, in the right areas, the less energy wasted.
Types of Training for Mountain Climbers
We would like to point out that nothing trains you for mountaineering like mountaineering. But, there is plenty of room for cross training (adding exercise movements that complement your climbing). And don’t forget that many people don’t have the time and resources to hit the mountains whenever they want. If they were to restrict their training to mountain-time only, they might miss out on opportunities to progress in strength and fitness.
There are essentially four different elements to a fitness regime for mountaineers
- Strength exercises
- Power Exercises
- Endurance exercises
- Mobility Exercises
We could also include stability exercises but most of the following movements require stability as fundamental components. This mountaineering exercise program can be used for improving allove elements of fitness.
A Note on Overtraining
We’re big believers in not pushing the body to the limit in training. There is a school of thought that says ‘train at a level that’s harder than you would experience in competition’, but this is old-school flawed thinking. Training high intensity for extended periods of time leads to overtraining. Adrenal fatigue, irritability, and an inability to perform under pressure are the only things that result from over-taxing your body throughout training.
If you have a fitness coach, then make sure he’s not pushing you to exhaustion during every training session.
The job of a good coach is to prevent athletes from over-training. The higher your level, the more important this is.
Strength Training Exercises
Moving heavy snow, climbing over boulders, and pulling your bodyweight onto ledges requires a lot of strength. This is even truer when you consider the equipment that mountain climbers carry. Walking uphill takes great endurance and strong lungs. Walking uphill with a 25-30KG pack on your back is not for the weak of legs.
Mountaineers that lack core strength carry their packs with bad posture. As a result, their joints, rather than their muscles, bear most of the load. These people get injured and fatigued quicker. Being strong is not only good for mountaineering, it’s good for life in general. Be strong!
So we’ve established that strength is good. But having the physique of a powerlifter or bodybuilder is not what we’re looking for. Being nimble and light is super important in the mountains. Carrying extra weight on your frame, despite the improvements in strength, can be detrimental. The goal with strength training for climbers is to improve relative strength while not increasing body weight or bulk so much that it hinders progress.
Fortunately, the training regimes we outline below build muscle and can reduce fat. They should not increase body weight to the extent that there is a negative impact on performance, even after taking in the improvements in strength.
Olympic weightlifters in the sub-69kg category would be considered light to medium weight in mountaineering circles. Yet these athletes are immensely strong. The secret is that they train for strength and power, not for mass. Bodybuilders train for mass and not for power. Don’t copy them! Bodybuilders generally don’t climb mountains and if they were to get caught out in the open they would starve to death long before the rest of us.
Two important areas to work on for mountaineering are the forearms and shoulders. Grip strength is obviously crucial and you should address any shortcomings in this area immediately. Most mountaineers already have reasonably strong legs and back. Rock climbers often have good finger, hand and forearm strength to hold onto things. But many need to work on full range of motion (ROM) power, flexibility and mobility under load, and pure strength.
What kind of exercises will improve strength for mountain climbing?
Using very broad strokes we’d say the following exercises would be the main ones: Pull-ups (for climbing walls), calf-raises (for the walk-in), lunges (for the walk-out and climbing/walking) and dead-lifts (for lifting packs, people, and equipment). This is a simplified look at the muscles used but we are believers in taking a holistic approach to weight training, as in every aspect of mountaineering.
Us mountaineers spend a lot of time pulling rope and hacking ice, movements that require plenty of bicep work. Many people could fall into the trap of exercising the biceps only. Of course, this is great if you’re only doing the sport for the aesthetic results. But we’ll presume you’re into the sport of mountain climbing for less superficial reasons. There’s nothing wrong with having a climber’s chiselled body though.
Full body exercises which utilise the core stabilizing muscles and the major muscle groups should be the basis of your workout. Don’t waste time on small muscles unless you’ve got imbalances or other issues.
The following exercises will make you strong not just for climbing, but for any sport. However, we’ve selected these exercises as they hit all the target muscles that mountaineers often need to work on.
- Back Squats
- Front Squats
- Pull Ups
- Military Press & Push Press
- Legless Rope Climbs
More advanced people could add the clean and jerk. If you’re shaking your head right now, think about this. Moving a heavy pack over your head is easier if you can drive from your core and legs. The clean and jerk technique teaches you how to move a very heavy weight from the ground to overhead, without completely trashing your shoulders.
#1 Back Squats
Know this: If you don’t perform back squats you aren’t doing real strength work. Back squats are important for building a strong posterior change and a core that can handle heavy loads. The squat is a fundamental human movement. Executing squats with good form improves posture and takes your strength to a new level.
Air Squat Technique:
The first thing to check is that you can perform a squat without any weight.
Standing with feet slightly wider than shoulder-width apart, begin pushing your knees out and lowering your body without leaning forward over your toes. Flex at the hips and continue squatting until your upper legs are below the knees. Put your hands out in front of you for balance.
Note: squatting to parallel is a bodybuilder exercise. A full squat requires you to squat down so your thighs are below the horizontal position. Despite some internet ‘experts’ claiming that this is bad for your knees, there is no evidence whatsoever to prove this. Millions of people deep squat routinely every single day and have no back or knee problems.
“If you don’t perform back squats you aren’t doing real strength work
Barbell Squat Technique:
The next progression is to place a barbell on your shoulders behind your neck and squat down as before. This time you won’t have your hands out in front for balance but the weight of the bar will help keep you from rolling forward. Engage the core when supporting a loaded barbell (engaging the core should be automatic but we’ll add it here for emphasis – an unengaged core and heavy barbell equals injury). Make sure that you don’t dip your body too far forward. Maintain an upright posture and push the knees forward and outwards. The knees should never move inwards. Your elbows should be pointed slightly behind you to give the bar a good base to rest on. Your core should be tight and the entire body should be stable.
The final progression is to add weight to the barbell. Start light until your technique is perfect. Have a trainer check your technique.
For a 90KG male, an intermediate (good) maximum squat is around 140KG (including the bar), but this could be some way off if you’ve just started this kind of training.
If you only have time for one exercise, the back squat should be it.

#2 Front Squats
Front squats are excellent for building core strength, improving posture, and for teaching stability under load. The quads will engage more with front squats (as opposed to the glutes and hamstring with the back squat) and you’ll need to work hard to maintain an upright posture. Front squats are great for improving your posture and can really help build strength for carrying loads in front of you. Imagine lifting a heavy rock, bag, or obstacle off the ground and moving it.
Front Squat Technique:
With the bar in the squat rack grab hold with arms slightly wider than shoulder-width. Move your body under the bar and point your elbows forward. Lift the bar up so it’s resting on your anterior deltoids (not on your clavicle or other bones). The bar should be pressed into your neck and will feel slightly uncomfortable, especially at the bottom of the movement. Maintain an upright posture while squatting down similar to performing a back squat. Engage the core and keep the elbows pointed forward (don’t let them drop).

# 3 Pull Ups
The Pull Up is a fundamental exercise for strength. Performing a strict pull up is difficult for a large percentage of the population. As mountaineers, we’d be expected to be able to do at least one strict pull up movement.
What is a Pull Up?
A pull up is performed by moving pulling your body upwards using your arms and back muscles.
In the gym, either jump up to a bar in a rack or grab hold from your standing position. Put your hands in a pronated grip (overhand) position on the pull up bar. Arms should be wider than shoulder width. Engage the lats (latissimus dorsi: the fan-shaped muscles that go from your mid-back to the shoulders) and using your back muscles primarily, pull yourself upwards until your chin reaches the bar.

At the top of the movement simply reverse the direction without swinging or losing form.
Remember that this is a compound exercise so always perform the pull up with full range of motion. If you stop short you will use more bicep and arm musculature (fine if you want to be a bodybuilder) and less lattisimus dorsi.
Variations include chin-ups, which put more emphasis on the biceps. To perform a chin-up simply grab the bar with the palms facing towards you and move your body until your head is above the bar. Mountaineers generally use a ‘palms facing forwards’ grip but this can be used as an alternative to training. Mixing up your routine with chin up moments occasionally will be good for you.
95% of people need both arms to perform a pull up but some people can do it with a single arm. Body mechanics play a big part in this so it’s not just a question of strength. You might see people gripping their forearms with the ‘free’ hand but this is not a strict single-arm movement. The gripping arm in this case, is being used as a lever.
Pull ups are compound exercises. Compound exercises recruit multiple muscles and include the main movers (back, glutes, quads, chest). These are the ones we like and the most beneficial for your overall body strength and health.
How does it help me as a mountaineer?
Moving your body by pulling on an ice axe and shifting your entire body to a higher ledge or handhold are examples of movements that are replicated by the simple pull up exercise. Pull ups hit the lats, forearms, biceps, and core. It’s an excellent exercise for building overall strength and a very important movement for mountain climbers.
I can already do pull-ups, how can I progress?
As any mountaineer with rock-climbing experience knows, your fingers do a lot of work. In fact, it’s more likely you will pull your body upwards using your fingers rather than the entire hand. So, as a progression from the usual pull up exercise, try some finger grip pull ups.
Doorways are a great training ground for this exercise. The ridge above the doorframe is small enough to be challenging and there’s not much of a drop if you fall off. Be careful with this one though. Make sure the door frame can support your weight.
 on the left and chin ups on the right")
#4 Military Press & Push Press
The military press is a shoulder, tricep, and core exercise. It’s a non-dynamic movement that tests your shoulder strength. The push press, which is similar to the military press, takes advantage of the power in your legs to move the bar upwards. It also demands good shoulder strength to maintain the weight overhead. (You can lift much heavier weights with the push press).
Military Press Technique:
Holding the barbell with hands wider than shoulder width apart, take the barbell off the rack and rest the bar on your deltoids, just as with a front squat.
Making sure that your quads, glutes, and core are engaged for stability, push the barbell upwards in a single motion. Don’t dip, swing, or move the rest of your body in any way to help the bar move. The military press is a shoulder exercise primarily and you should feel the deltoids and triceps work pretty hard.
Push Press Technique:
Prepare for this pressing movement in the same way as you would for the military press. The difference is in how you move the bar. Slowly dip slightly at the knees (without leaning forwards or backwards), and return to full height quickly and explosively. At this point guide the bar upwards. The momentum gained by dipping and pushing upwards with the legs will move the bar. Pushing at the same time will allow you to move heavier weights than with the military press.
Let your head come forward to create stability in the shoulders and hold the bar overhead with straight arms.
#5 Legless Rope Climbs
Gymnasts perform lots of legless rope climbs. As a result, they develop extremely strong forearms and biceps. These are the same muscles mountaineers use for wielding ice axes, pulling themselves up, and handling ropes. Biceps are the prime movers in any pulling action involving the arms.
You can’t stand on the rope or hook your foot or leg around the rope in this movement. This makes the climb much harder but has greater benefits for the upper body strength.
We don’t think we’ve ever heard another mountaineer mention rope climbs as part of their routine but we love them (in a twisted way). Believe us, they will build arm strength like no other exercise.

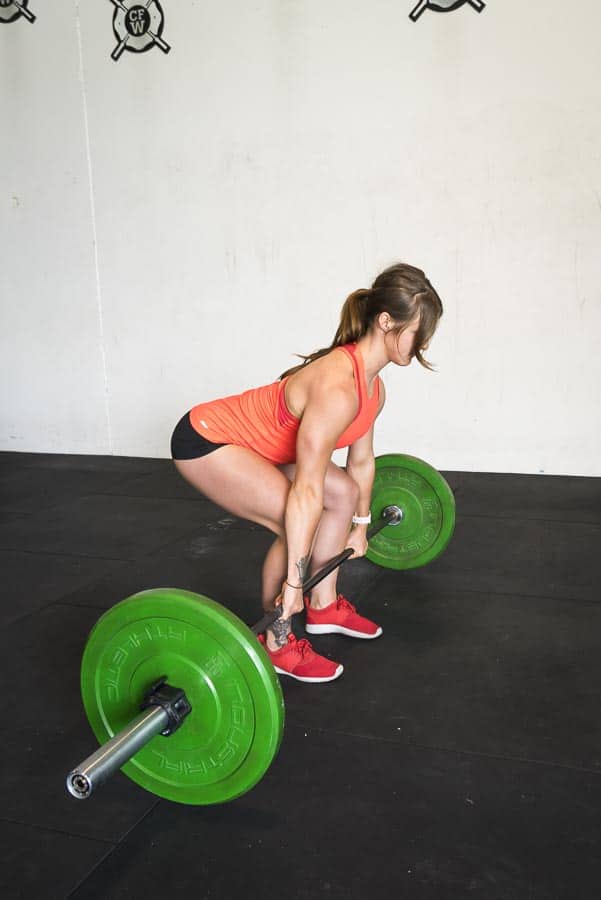
#6 Deadlift
The deadlift vies with the Squat as the king of all strength exercises. The deadlift is practical. The movement involves picking a heavy object off the ground and standing upright while maintaining a hold on the object through all phases. The carryover to real life and mountaineering is obvious. Good deadlift practice helps you lift heavy boxes, packs, supplies, injured people, and bags of ropes.
Standing in front of a barbell with your shins touching the metal, grab the bar with both hands about shoulder-width apart. Shoulders should be directly over the bar. Keep your feet flat on the ground and spaced a little closer together than your grip. Keep a straight back while bent at the knees and hips. Look straight ahead. Engage your lats, core, and glutes and stand up pulling the bar with you. Maintain straight arms and a flat back throughout the movement.
Remember:
- straight back
- tight core
- shoulders over the bar
- Flex the muscles of the quadriceps and glutes
The deadlift works the muscles of the lower back, lats, biceps, shoulders, hamstrings, quads, and glutes. It’s a fantastic exercise for building brute strength.
Most men should be able to deadlift twice their own body weight. If you’re an 80kg man, aim for 160kg but start out slowly, focusing on technique.

Power Exercises
Power is the ability to exert maximal force in the shortest time possible. Moving yourself or another heavy object through space quickly could be the difference between success and failure. Rock climbers are all about power. They are light and nimble but pack a lot of power.
#1 Hill Sprints
This one is technically easy to perform but is taxing on the lungs and quads. It’s also a great exercise that you can perform anywhere you can find a slope. Of course, running isn’t part of our sport but this form of cross training will ramp up your aerobic capacity.
- Find a steep hill (the steeper the better) and make sure there are no hazards such as cars, potholes, or rocks.
- Sprint as fast as you can up the hill for no more than 30 seconds. Depending on your fitness level you will probably start to feel your lungs burn up after 20 seconds. The steeper the slope the more intense the burn.
- Take a rest of 1-2 minutes
- Repeat
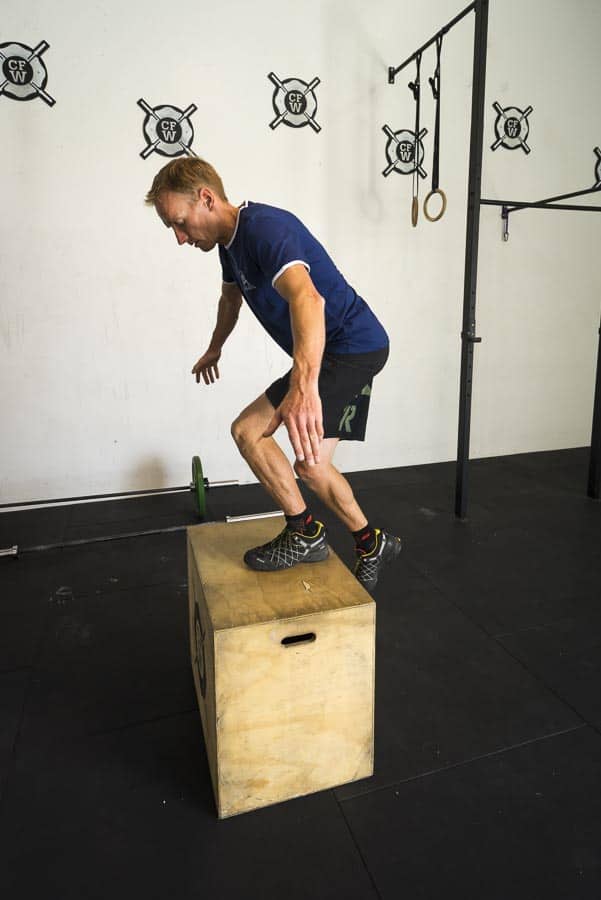
# 2 Box Jumps
Jumping is a form of plyometric training and recruits the power base of the legs.
This is not an exercise for people with dodgy knees. Many mountaineers have the odd twinge in their knee so check with a physio, GP, or trainer before trying out box jumps. If you can handle them, box jumps are one of the best power exercises you can do with almost no equipment.
Trudging over rocks and vertical ascents with a heavy pack can play havoc on the knees. That’s why we recommend strength exercises like the squat, front squat and deadlifts to help build up the quadriceps muscles. Once you have the strong base, jumping becomes easier. Stronger quads will help stabilise the knees and take the pressure off the joints. Anytime you can take the pressure off your joints by letting your muscles take the strain you will help protect yourself from injury (short and long-term).
Jumping teaches your quads, glutes, and hamstrings how to fire together to produce a lot of force. Athletes that train for strength and power often use jumps to help break personal bests.
Technique:
- Stand close to a solid box of about knee height.
- Engaging your glutes and core, swig your arms forwards and upwards, and jump at the same time.
- Land with both feet on the box in a half-squat or full-squat position.
- Stand up to full height.
- Drop back down or step off the box and repeat.
Simple enough but you’d be surprised how many people perform this exercise incorrectly.
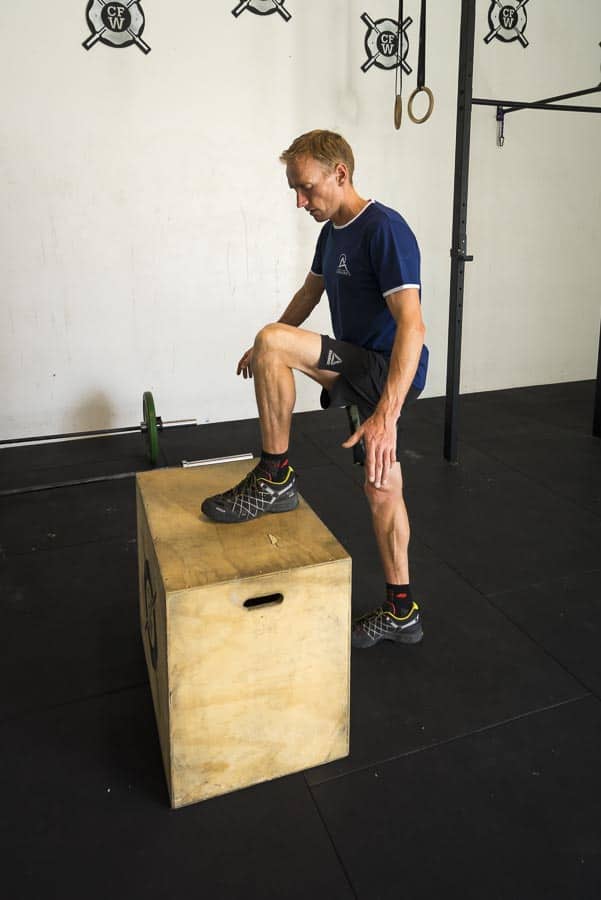
If jumping is not an option because of bad knees or back, you can still benefit from the strength and endurance gains of box steps. Using a single leg, step up onto the box and stand up straight. Step back down with the same leg. Repeat for the other side.
To add a progression to this exercise wear a pack loaded with some weight.
The box step-up can really help with strength and stability. Any issues with knees travelling inwards, inflexible hips, or imbalances between legs become apparent quickly with this exercise – Dan McDonald, CrossFit Wanaka
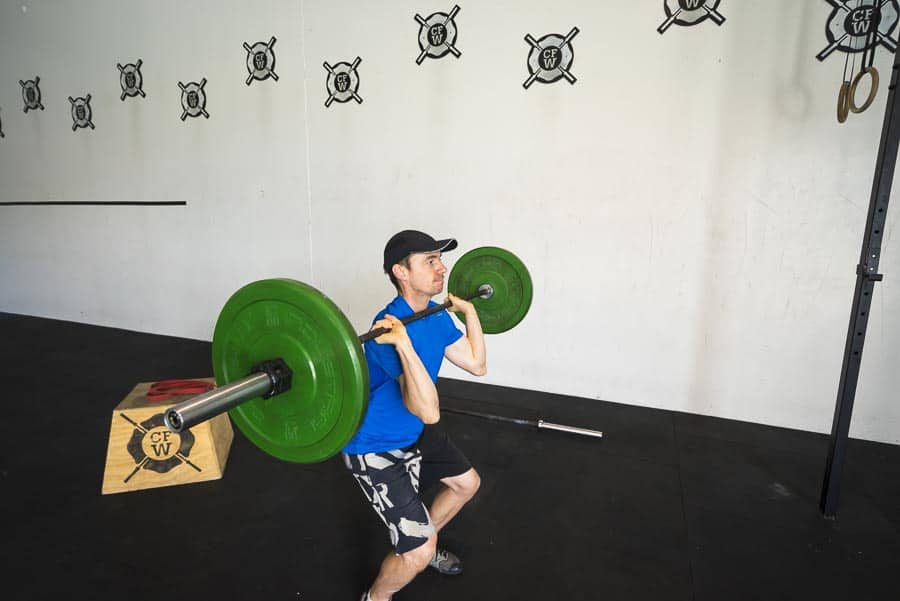
#3 Cleans
We love cleans. Moving a weight off the floor and into the front-rack position (resting on the front of your shoulders) is very satisfying. It’s not easy but learning to do a clean will improve your power and speed. You also need a strong set of core muscles to lift heavy weight with good form.
This is an advanced exercise and if you’re new to the weight training game, we don’t recommend you to try it without proper supervision. Find a qualified trainer or lifting coach and get the technique down perfectly. It will pay you back ten times over in time and money invested.
- Starting as usual with feet shoulder width apart and close to the bar.
- Grab the bar with hands slightly wider than shoulder-width.
- Maintain a flat back, tight core and neutral head position. Look forward, not down
- Your hips should be a bit lower than you would have them when performing a deadlift
- Shoulders should be slightly ahead of the bar. Don’t have them behind but directly over the bar is acceptable.
- Move the bar upwards with medium speed by extending the hips until the bar is above the knees
- From this point, explosively extend the hips while moving the bar towards your midline.
- Connect with the thighs and shrug the bar towards the ceiling. The momentum should carry the bar directly upwards.
- Quickly squat under the bar and catch it in a front squat position.
- Maintaining a flat back and tight core, stand up straight.
#4 Dynamic Pull Ups
This is a tricky one for most gym rats but mountaineers and rock climbers will find it easier to handle. Lighter mountaineers will have an advantage.
An advanced movement suitable for people with good power or for expert rock climbers.
Starting by hanging from a bar, perform the pull up movement as fast as you can and move your body as high as you can. If you can generate enough power you will propel your head past the bar. Release your hands at the top of the movement and then catch the bars again on the way back down.
The difference between this movement and a normal pull up is the speed and power required to move the body upwards quickly so that the hands can release and catch again in one movement.
Endurance Exercises
We’re not going to spend too much time talking about endurance. Most mountaineers and rock climbers have a pretty good engine already. But these additions to your training will definitely help with cross training the cardiovascular system.
Endurance is essential for mountain climbing. Training your muscles to take a constant, unrelenting, load over long periods of time comes mostly from climbing itself. However, there are other ways of training for endurance, off the mountain. And as we’ve discussed earlier, mixing up your training can give you the edge over the guys and girls that only train one way.
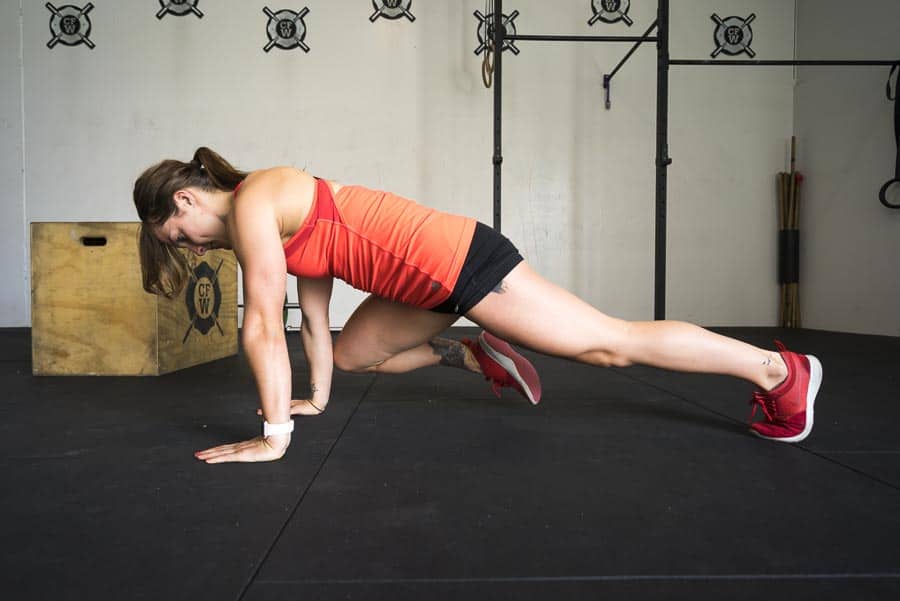
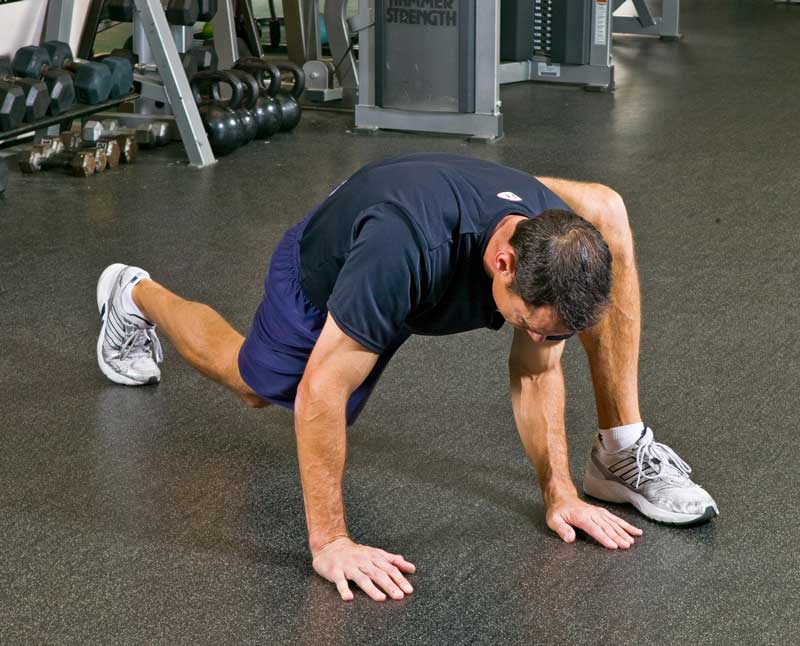
# 1 Mountain Climber Exercise
This exercise has nothing to do with mountain climbing but we love the name and it’s quite a functional exercise. The mountain climber is a core exercise with some leg work that will get the heart pumping like nothing else.
- Start in the plank position – body completely straight and straight arms like at the top of a pushup.
- Bring one knee as close as you can to the elbows
- Keep your hips low and in line with your back, feet and head.
- Maintain a flat back
- Return your leg to the starting position by extending the knee and bring the other leg towards your other elbow.
- Repeat quickly and try to have both legs moving at the same time.
Mountain Climbers train your body to engage the core in the plank position as your legs go through challenging ‘knee raise’ movements. The Mountain Climber is primarily an aerobic exercise. But imagine scrambling over an uneven surface with a pack on your back. Rounding or over-arching the back while moving through the terrain will set you up for potential injury. Use Mountain Climbers to train the body to be efficient in scrambling. Moving fast is usually a priority as you might be in an avalanche zone.
The mountain climber works your abdominal (obliques, transverses abdomen), lower back, chest, and hip flexors muscles. Your cardiorespiratory system will also be challenged. Your arms, chest, and back muscles will work isometrically. Isometric exercises are those which do not involve changing the length of the muscle. Imagine tensing a muscle, like your quadriceps, and holding it in the tensed position. That’s an isometric contraction. The more common way to exercise muscles is to perform isotonic exercises but isometrics have their place.
Arnold Schwarzenegger was a big proponent of isometrics. That’s not to say that isometric exercises are a strict bodybuilder exercise. We’re not sure if Arnold is a mountaineer, but he does know a bit about strength and conditioning.

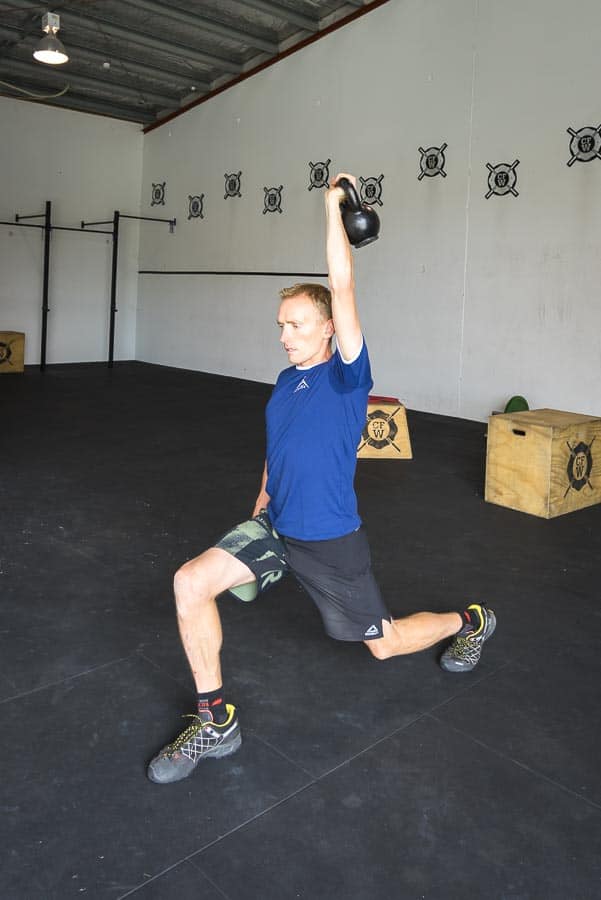
#2 Walking Lunges with dumbbells or Kettlebells
These unilateral exercises not only teach your body how to be strong and stable but they also build endurance. The glutes also get a fantastic workout. Squatting down into a chair is always a painful experience the day after lunges.
Single leg and single arm (unilateral) movements are great for mountain sports enthusiasts as they mimic the natural movements in sports such as trekking, rock-climbing, and ice-climbing – Ashley, CrossFit Wanaka
Technique:
- Holding two dumbbells or kettlebells (one in each hand) stand tall and look straight ahead. Make sure that you have at least 10 metres of space in front of you.
- Taking one step forward and lunge down until your trailing knee almost hits the ground.
- Push through the feet and bring the trailing leg forward to the meet the leading leg.
- Repeat with the other leg.
This exercise will challenge you in many ways. Any imbalances in strength in one leg over the other will become apparent after walking several lengths. Your overall balance will be put to the test by the use of weights in each hand. You will need to maintain good posture and stability to prevent the weights from pulling you over.
Mobility Exercises
Mobility exercises train your body to become comfortable with the normal human range of motion in joints. Modern-day desk jockeys are often classic examples of low mobility individuals. If you have a desk job it’s worth getting a professional to examine the Range of Motion (ROM) in your joints to see where you stand among the average Joe.
But you’re a mountaineer, you’re strong and fit, so mobility is not an issue, right? Well, no. You might be the best mountaineer in the world but if you have low mobility in your ankles for example (as many mountaineers do) then you are leaving yourself open to injury. People with tight ankles often have trouble squatting.
Why squat, you might ask? Well, it’s probably the most fundamental human movement after walking. Squatting for 10 minutes a day should be a goal for everyone. The benefits of full-range squats include increased flexibility in the back, hips, and ankles. Better posture, better ability to move heavy objects, more explosive power, increased athletic ability, and last but not least, better toilet habits. That last one, we won’t get into here but we’ll just point out that sitting on toilets is not good for the body. Squatting to do your toilet business is much, much healthier.
Mountain boots are a killer for the lower foot. Sticking your feet into rigid boots and climbing mountains puts enormous strain on the feet, calves and ankles. As a result, calves and heels become tight and inflexible and calves take on the consistency of steel. Soldiers, construction workers, and mountaineers often suffer from inflexible ankles.
You might ask how that will hamper your mountaineering efforts. Well, squatting, as we mentioned earlier, is a fundamental human movement but to perform a correct squat requires good ankle mobility. Increasing the range of motion in your ankles will reduce the chance of injury. Inflexible ankles will force your knees, hips or lower back to move where they shouldn’t. And that’s not going to be a pleasant experience.
Hunched forward shoulders are the typical posture of office workers who spend long hours gazing at a screen with their head forward and upper back in a rounded position. Mountaineers can also suffer from the same problems. Heavy packs, poor walking technique, fatigue, and a whole range of other influences can create tightness across the chest and rounded shoulders. A tight chest means that the lungs are restricted and your breathing is affected as a result. It also opens you up to injury.
#1 Slam Ball Ankle Stretch

For this first exercise, you’ll probably need to find a gym but you can also use a weight plate or heavy object. Grab a slam ball weighing between 15 and 30kg. Put one leg forward in the bent knee position with the other leg straight (or in any relaxed position) behind you. Lift the heavy slam ball onto your thigh and press down using the weight of the ball and the pressure you add to push the knee over the toes.
Wait 30-60 seconds and repeat on the other side.
As your ankle becomes more mobile, you can increase the time in the stretch. Try to work up to 2 minutes per side.
#2 Plantar Fascia Myofascial Release
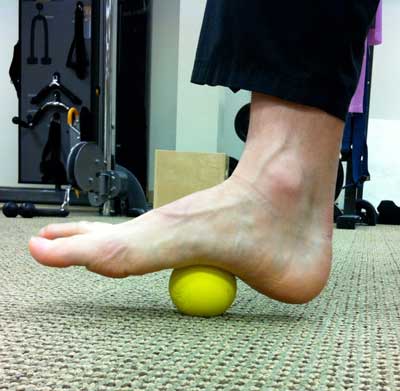
Grab a lacrosse ball, hockey ball, or any small hard round object. In the standing position put the ball under your foot. It’s better to be barefoot for this exercise. Roll your foot back and forth on the ball increasing the pressure whenever it feels uncomfortable or “painful”. Pain is usually felt whenever you encounter a knot. These are the pressure points that we want to break up with the ball. Increasing pressure on the knots will eventually release the tension and the discomfort.
Spend 5-10 minutes per leg. The first time you do this exercise will be particularly uncomfortable for most people but stick with it. It’s very effective.
#3 Standing Wall Stretch
Stand about 2 feet from a wall. Place both hands on the wall, pull your shoulder blades back, tighten the core, and gently press your chest towards the wall. Hold for 30-60 seconds. You should feel the shoulders and chest loosen up quite a bit.
#4 Pec Release

Grab the lacrosse ball from before and find a wall or squat rack upright in the gym. Placing the ball on the wall a bit lower than chest height and carefully press one side of your chest into the ball. Apply pressure on the ball which is now between the wall and one pec. Find the sore spots and stay there.
If you are tight across the chest, do a lot of pushups, or work out regularly, you will feel plenty of soreness here. Men, in particular, tend to have very tight pectoral muscles. This exercise is a great way to find the knots and apply pressure to release tension.
#5 Pigeon stretch

This strange sounding stretch is effective at loosening the glutes and hips.
Start in a kneeling position. Put one leg out in front with the knee still bent. Lower your knee onto the floor by moving your body forward. Keep the angle pegged to the floor and the knee bent at 90 degrees. Maintain an upright posture and feel the stretch from the glutes to the knee. Hold for 30-60 seconds. Change legs and repeat.

#6 Hip Flexor Lunge Stretch
Starting in the pushup position bring one foot up alongside your hands. If you’re particularly inflexible this will be difficult so don’t try to move the leg so high. Start slowly and move to the full stretch later. Next, try to put your hands or elbows on the floor feeling the stretch right through the hips and glutes. Hold and change sides.
This is our favourite exercise for releasing the hips and it’s one we recommend everyone do on a daily basis.
Conclusion
Most serious athletes cross-train. Mountain climbers are still quite resistant to the thought of doing exercises that don’t directly involve climbing but incorporating other forms of exercise into your routine helps prevent injury and boredom. It can improve your climbing speed and efficiency.
Strength, endurance, and power training can help highlight issues with your technique. Training outside of your comfort zone is a great way to mix things up, keep your muscles from overtraining, and help prevent injury
But don’t forget that 50% of climbing a mountain is physical. The other 50% is mental. If you don’t have the drive, determination, and resilience for climbing mountains then all the strength and fitness in the world won’t help.
Mountaineering for us is quite a spiritual experience and we encourage our clients to discover their own aspirations and face their fears. Being in the mountains is physically challenging but can help free your mind. The better you’re able to handle the physical conditions, the freer your mind will be.